Amazon wholesale product research: how to analyze a supplier price list
Analyzing a wholesale price list means running every line through the same checks: match the UPC to the right Amazon listing, work out your cost per sellable unit, subtract Amazon's fees, and keep only lines that still make money at a realistic price with steady sales. Then confirm approval, brand risk, hazmat and expiry before anything goes on an order.
- Most lines on a typical price list are not worth buying. That's normal, and it's why you check the whole file instead of hunting for one winner.
- Clean the file before you check anything: barcodes kept as text with their leading zeros, and one cost for one single unit.
- Judge profit at the price a product usually sells for, not today's Buy Box. A price spike is the easiest way for a "profitable" line to lose money.
- Forty sellers on a listing doesn't mean forty competitors. Count the FBA sellers priced near the Buy Box.
- Approval, brand complaint risk, hazmat and expiry come last, on the short list. The brand check is always done by hand.
This is stage 6 of the Amazon wholesale roadmap. You've opened an account with a supplier (or you're about to), and the rep has emailed you a spreadsheet: hundreds or thousands of lines with item names, barcodes, case packs and your cost. This guide is how you turn that file into a short list you'd actually spend money on, and then into a first wholesale order.
The method follows Apex University's purchasing lessons, where Stef, who teaches the course, works through real supplier lists on screen. We link the minute in each lesson where he makes each cut. Where Amazon has a rule that matters, we link Amazon's own US page, and we say so when that page needed a Seller Central sign-in we didn't have while writing.
Start from a price list, not a product idea
In private label you start from a product idea and go looking for a factory. Wholesale works the other way around. The supplier's price list is your whole universe: you can only buy what they carry, at their price, in their case packs. So product research in wholesale is mostly filtering a list of things you can definitely buy down to the few that make sense on Amazon.
That's why starting from a list beats starting from a "winning product" you spotted on Amazon. A great listing is no use if no distributor will sell it to you, while every product that survives your checks on a price list is one you can actually order.
A few things to expect before you open the file:
- Most lines won't pass. On a typical list, the share that clears your bar is small. That's the filter doing its job, not the supplier failing you.
- Every distributor is different. The same product can work from one supplier and not another, because the unit cost is different. Check every list you're given.
- Prices go stale. A list from three months ago may not be what you'd pay today. Ask for the current one before you spend hours on it.
If you don't have a list yet, start with finding wholesale suppliers and opening a wholesale account. The Distributor Vault is Apex's directory of US wholesale distributors.
Clean the file first
A messy file gives you wrong answers in every check that follows, so spend ten minutes here first. These are the problems that most often trip people up.
Barcodes that lost their leading zeros. Spreadsheets treat a UPC as a number, and numbers don't keep leading zeros. A 12-digit UPC that starts with 0 quietly becomes 11 digits, and then it matches nothing. Format the barcode column as text before you paste anything into it. If the zeros are already gone, a UPC should be 12 digits long and an EAN 13, so pad the short ones back with zeros at the front.
Barcodes shown as 8.5E+11. That's scientific notation. Switch the column to text and compare a few codes with the supplier's original file. If the file was saved as a CSV while the codes looked like that, the missing digits are gone for good, and you'll need a fresh copy from the supplier.
Case barcodes instead of unit barcodes. Some lists carry the barcode printed on the shipping case, which is often 14 digits. It won't match the single-unit listing on Amazon. Ask the rep for the unit UPC.
Costs per case, not per unit. Some lists quote the price of a whole case, some of an inner pack, some of a single item. Every check below needs the cost of one single unit, so divide case prices by the case pack.
Dead lines. Delete discontinued, out-of-stock and special-order lines before you start, unless the rep says they're coming back.
Keep the item title (with its size or count) and the supplier's own item number, too. You'll need the title to confirm matches and the item number to order. Here is the layout we suggest, one row per item:
| Column | What goes in it | Why it matters |
|---|---|---|
| Title | The item name with its size or count, as the supplier writes it | Lets you confirm the barcode matched the right listing |
| Vendor SKU | The supplier's item number | You order and reorder by it |
| UPC (or EAN) | The unit barcode, stored as text | It's how a line is matched to Amazon |
| Unit Cost | What you pay for one single unit | Every profit number starts here |
| Case Pack | Units in one case | You usually buy whole cases |
| Bundle Qty | Units sold together as one Amazon listing | A 2-pack listing costs you two units |
These are the column names Apex Green reads when you upload a list, so the same file works whether you check it by hand or in a scan.
The ten checks, in order
The order matters. The first checks are quick and cut the most lines, so you only spend real time on the products that survive. The slow, by-hand checks come last, on a short list.
| # | Check | A line fails when |
|---|---|---|
| 1 | Match the UPC to the right ASIN | There's no match, or the match is a different size or count |
| 2 | Cost per sellable unit | The listing needs more units than you priced in |
| 3 | Landed cost | Freight, prep and Amazon's inbound charges eat the margin |
| 4 | Amazon's fees | Fees leave too little at the selling price |
| 5 | Profit, ROI and margin at a realistic price | It only makes money at today's price |
| 6 | Sales and seasonality | It barely sells, or only for a few weeks a year |
| 7 | Competition and Amazon on the listing | Too many FBA sellers at the Buy Box price, or Amazon holds most of it |
| 8 | Approval for your account | You can't get approved in time to sell it |
| 9 | Brand complaint risk | The brand restricts Amazon sellers or files complaints |
| 10 | Hazmat, meltables and expiry | You're not set up to ship it, or the stock is too close to its date |
1. Match each UPC to the right ASIN
Amazon gives every product page its own ID, the ASIN. Your first job is to find the ASIN that is the exact item on your list. A barcode can match one listing, several listings or none.
- One listing, same item. The easy case. Still open it once and compare the image, size and count with the supplier's title.
- Several listings. Searching one barcode can bring up a single unit, a 2-pack and a 6-pack listed by different sellers, or a duplicate page. Pick the one that matches what you'll actually send in, and note its pack size in the Bundle Qty column.
- A variation. If the product page has sizes or colors, make sure you matched the right child, not the parent.
- No match. The product isn't on Amazon under that code. Creating new listings is a different business from reselling existing ones, so most wholesale sellers skip these lines.
For a one-off lookup, Amazon's own Revenue Calculator lets you search by UPC, EAN, ASIN or title.
2. Work out the cost per sellable unit
Your cost per sellable unit is the unit cost times the number of units in the Amazon listing. A single-unit listing costs you one unit. A 2-pack listing costs you two.
Stef walks through exactly this in his Purchasing lesson at 4:15. The item costs $6.59 a unit, the Amazon listing is a pack of two, and the supplier ships 24 units in a case. So each Amazon unit costs $13.18 before anything else, and one case makes 12 sellable Amazon units, not 24. Get this wrong and every number after it is wrong by half.
If the supplier offers lower prices at higher quantities, use the price for the quantity you'll really buy on a first order, not the best tier on the sheet.
3. Add everything it costs to reach Amazon
The unit cost is only what you pay the supplier. Landed cost is what it really costs to get one sellable unit into an Amazon warehouse:
- the unit cost (times the bundle quantity, from check 2),
- freight from the supplier to you or your prep center,
- prep and labeling, such as bagging and FNSKU labels,
- shipping from the prep center to Amazon,
- Amazon's inbound placement fee, which depends on how you split your shipments.
"When you read landed cost, this is the true dollar amount that it will cost you to bring this inventory inside Amazon Fulfillment Centers."
From Stef's lesson, Purchasing at 4:51
Freight is the part people guess. In the same lesson at 3:55, Stef estimates inbound shipping at 60 cents a pound and says he usually pays roughly 42 to 52 cents. Estimating high on purpose means a product that passes still passes when the real bill arrives. That's his experience on his own shipments, not a rate you're promised, so use your own quotes once you have them.
4. Subtract Amazon's fees
Amazon takes several fees from an FBA sale. The two that hit every unit are the referral fee and the FBA fulfillment fee.
- Referral fee. Look up the product's category in Amazon's referral fees by category.
- FBA fulfillment fee. A per-unit fee set by the product's size tier and weight. Heavy and oversized items pay much more, so never guess it from the category. Our guide to FBA size tiers and fulfillment fees explains how the tier is worked out.
- Monthly storage. Charged on the space your stock takes up. Amazon's supply chain page shows a higher rate for October to December than for the rest of the year. See Amazon FBA storage fees.
Amazon's Revenue Calculator estimates the referral fee, fulfillment cost, monthly storage and variable closing fees for any product you search. Amazon's own guide to it says long-term storage, removal orders and returns processing aren't built in, so add those yourself if they matter for the product. For the whole picture, start with Amazon FBA fees explained.
5. Profit, ROI and margin at a realistic price
Three numbers decide whether a line is worth buying:
- Profit per unit is the selling price, minus Amazon's fees, minus your landed cost.
- ROI (return on investment) is profit divided by what you put into each unit: unit cost plus prep and shipping.
- Margin is profit divided by the selling price.
One example, with made-up numbers: a product sells for $25.00, and Amazon pays out $17.50 per unit after its fees. Your landed cost is $10.00. Profit is $7.50, ROI is 75% and margin is 30%.
What counts as good depends on how fast the product sells. Stef's own first filter on one personal care supplier was at least $1.50 profit and 20% ROI (Purchasing at 5:38), because those items were cheap and sold hundreds of units a month. Those were his settings for that list, not a benchmark. For realistic ranges, see wholesale profit margins.
The harder question is which price to use. Today's Buy Box price can be a spike. Look at what the product has sold for over the last 90 days, and judge it at the lower end of that range.
"So if you were to purchase this item just reading off the current buy box price, you could actually potentially be at a loss."
From Stef's lesson, Purchasing at 10:32
In that example the product was selling at $18.41 and looked like $7.62 profit a unit, but its 90-day average was around $10. Our guide to reading Keepa charts shows how to read that history. One more thing Stef points out in his walkthrough lesson at 13:53: if a product shows no average Buy Box price at all, there was no Buy Box or it was suppressed. That doesn't make it a bad buy, but it does mean you need to look closer.
You can also run the math backwards, from the ROI you want to the most you can pay the supplier. If Amazon pays out $17.50, prep and shipping cost $1.50 and you want 30% ROI, the most you can pay is about $11.96 a unit. That's the number to take into a negotiation. The calculator below does both ways, using Amazon's referral fee table; type the FBA fulfillment fee from the Revenue Calculator.
Profit and most-you-can-pay calculator
Per unit, from Amazon's FBA fulfillment fees page or Amazon's Revenue Calculator. Leave it empty if you ship orders yourself.
Per unit.
Per unit: storage, returns, ads, anything else you count.
Per unit.
Type what you pay the supplier.
Runs in your browser from Amazon's published US fee tables. Nothing you type is sent anywhere.
6. Sales and seasonality
A product that makes $8 a unit but sells twice a month will tie up your cash for a long time. Check how fast it sells before you check anything slower.
- Sales rank (BSR). Every product has a rank in its category. The lower the number, the faster it sells, but a rank only means something inside its own category. In his lessons Stef keeps his first pass broad, ranks 1 to 150,000, then narrows to 1 to 90,000 when he wants faster sellers. Those are his settings, so adjust them to your categories.
- Recent sales. Many Amazon search results show roughly how many units were bought in the past month. Use it as a rough signal, not a count.
- Seasonality. Look at a full year of rank history, not just the last month. Some products sell mostly in the fourth quarter; others only in summer. Buying a seasonal product in the wrong month means paying storage while you wait.
How many of those sales you can expect to get is a question for the order itself, which your first wholesale order covers.
7. Competition and Amazon on the listing
On a wholesale listing you share the product page with every other seller, and the sale goes to whoever holds the Buy Box at that moment. So the question isn't how many sellers there are. It's how many are really competing with you.
"The only real competitors are people selling at the competitive price for this item and doing FBA."
From Stef's lesson, Purchasing at 16:47
In that example the listing had about 40 sellers, but most shipped orders themselves or were priced well above the Buy Box. Only about five were FBA sellers at a competitive price. Here's what to look at:
- FBA sellers near the Buy Box price. These are your competitors. Sellers who ship orders themselves, or who are priced far above, mostly aren't.
- A falling price and a rising seller count. Together they usually mean a price war. By the time your stock arrives, the margin you modeled may be gone.
- Amazon on the listing. Many new sellers skip every product Amazon sells. Stef's advice in the walkthrough lesson at 14:20 is to look at how much of the Buy Box Amazon actually holds instead. If Amazon takes most of it, there's little left. If it holds a small share of a fast seller, the rest goes to sellers like you.
8. Approval for your account
Some products need Amazon's approval before you can sell them, and approval differs from one account to the next. Check this after the numbers, only on the lines that passed. There's no point applying for a product that doesn't make money.
To check one product, search it in Seller Central's Add a Product tool and look for Show limitations. Our guide to Amazon gated categories shows where approval sits and how to check it, and the ungating guide covers applying.
A gated product isn't automatically a no. Approval usually rests on invoices from your supplier, so a distributor who sells you the product can also be your way in. The invoice requirements for ungating explain what Amazon looks for.
9. Brand complaint risk, checked by hand
This check can't be automated well, so it's yours to do by hand, on the short list only. Some brands don't want resellers on Amazon and act on it, and a complaint against your listing can affect your account health.
Here's how to check a brand before you buy it:
- Ask the rep. Is the distributor authorized for this brand? Does the brand restrict sales on Amazon or set a minimum advertised price?
- Look at the listing. If a fast-selling product has only the brand (or only the brand and Amazon) selling it, other sellers may have been pushed off. That's a warning sign, not proof.
- Look for Transparency. Amazon's Transparency page says that for an enrolled product, a valid Transparency code must accompany every unit listed or shipped. If your supplier can't supply coded units, you can't sell it.
- Search seller communities for the brand name with words like "IP complaint." Treat what you find as other sellers' reports, not facts.
Some brands sell to resellers only with a letter of authorization. If a brand on your list asks for one, that's useful to know before you order.
10. Hazmat, meltables and expiry
The last check is whether Amazon will take the product into FBA at all, and for how long.
Hazmat. Amazon's seller blog describes dangerous goods as products that could pose a risk if not stored, shipped or handled properly, such as aerosol cooking sprays and anything with lithium batteries. When you list one for FBA, you're asked for dangerous goods information, you may have to upload a safety data sheet or exemption sheet, and Amazon's dangerous goods team decides whether the inventory is safe for FBA. Amazon's dangerous goods identification guide has the detail, but it needs a Seller Central sign-in, so we couldn't open it while writing this.
In the Purchasing lesson at 6:56, Stef deletes the one hazmat product that passed his filters before anything else, because hazmat shipments need a separate prep process. His advice for new sellers is to leave hazmat alone until you're set up for it.
Meltables. Heat-sensitive products such as chocolate and gummies are only accepted into FBA during part of the year. Amazon sets the window on its meltable FBA inventory page, which also needs a sign-in, so check the current dates there before you buy a meltable. Our grocery guide explains what the window means for seasonal stock.
Expiry. Anything that can expire, from snacks to supplements to cleaning products, has to arrive with enough shelf life left.
Amazon sets a minimum shelf life on arrival on its expiration-dated products page. That page needs a Seller Central sign-in, and we couldn't open it to check the current wording, so read it there before you buy anything with a date on it. A product people use slowly, such as a large tub of a daily supplement, needs more shelf life left than a snack.
Ask the rep how fresh their stock usually is before you order anything with a date on it. Short-dated lots are sometimes sold cheaply for a reason.
- The UPC matches the exact item, size and count on Amazon
- Cost per sellable unit includes the bundle quantity
- Landed cost includes freight, prep, labels and inbound placement
- Amazon's fees are worked out for this product, not guessed
- It still makes your profit and ROI at its 90-day price
- It sells steadily, and you know its season
- You counted only FBA sellers near the Buy Box, and checked Amazon's share
- Your account can sell it, or you know how you'll get approved
- The brand doesn't restrict Amazon sellers, and Transparency isn't a blocker
- It isn't hazmat or meltable (or you're set up for it), and the stock is fresh
Doing it by hand, for free
You can do every check above with a spreadsheet and Amazon's own tools. It's slow, but it teaches you what the numbers mean before you pay for anything.
- Clean the file and add your columns
Fix the barcodes and costs as described above, then add columns for the ASIN, selling price, Amazon's fees, landed cost, profit and ROI.
- Look up each line on Amazon
Search each UPC in Amazon's Revenue Calculator (Amazon's guide links a public version) or on Amazon itself. Note the matching ASIN, its price and its fees.
- Cut on profit first
Delete every line that clearly loses money at today's price, and move the near misses to a separate tab so you can look at them again next month. You'll judge the survivors at their usual price in the next step.
- Check price history and sales on the survivors
Open each remaining product in Keepa or a similar price history tool and judge it at its usual price, not today's.
- Finish with the slow checks
Competition, approval, brand risk, hazmat and expiry, on the short list only.
The catch is time. At a few minutes a line, a list of a few thousand lines is days of work, and prices move while you go. Plenty of sellers check by hand first, to learn, and switch to a scanner once lists get long.
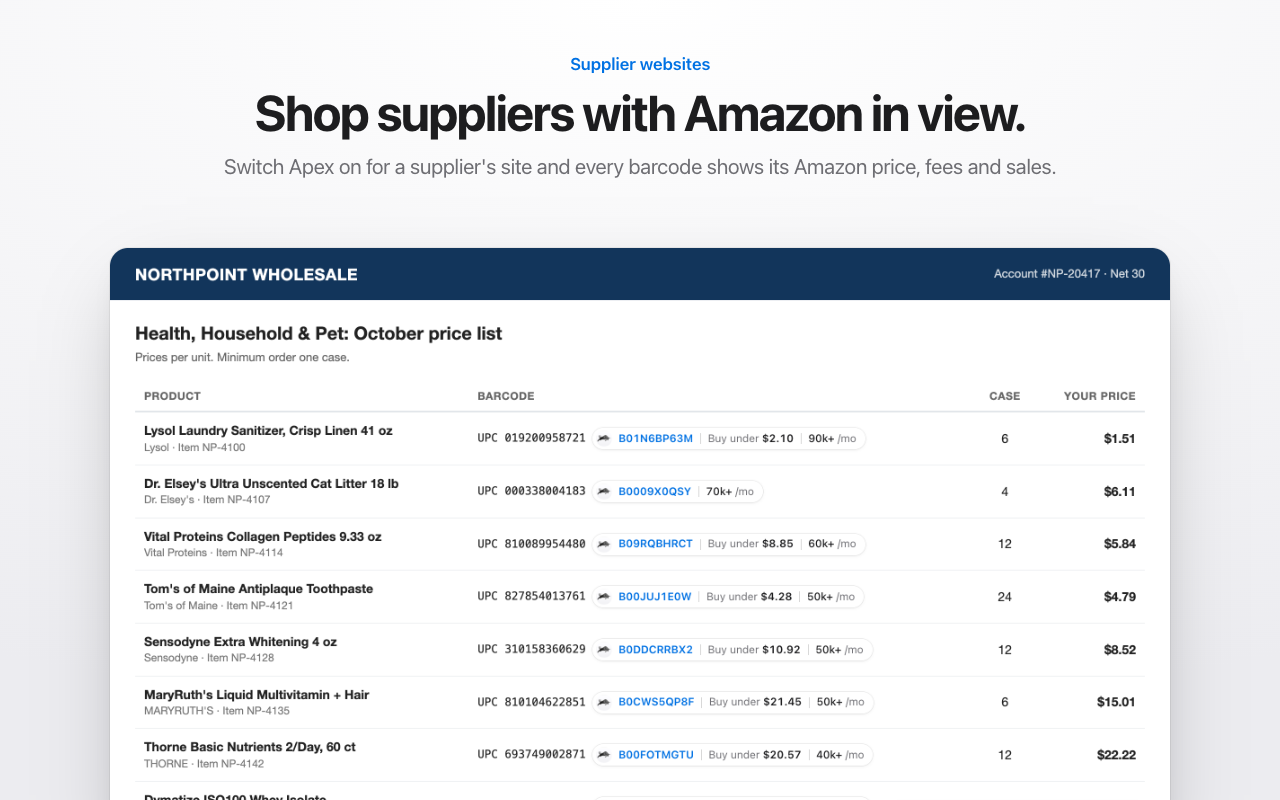
Two things make the hand method faster. The free profit calculator has a "Most I can pay" mode too, so keep it open in a tab while you work through the sheet (unlimited, no sign-in). And there's the Chrome extension. It's free to install, and its numbers open when you finish Apex University. Switch it on for a supplier's website, and it puts Amazon's numbers next to each barcode as you browse the catalog.
Doing it with a scanner
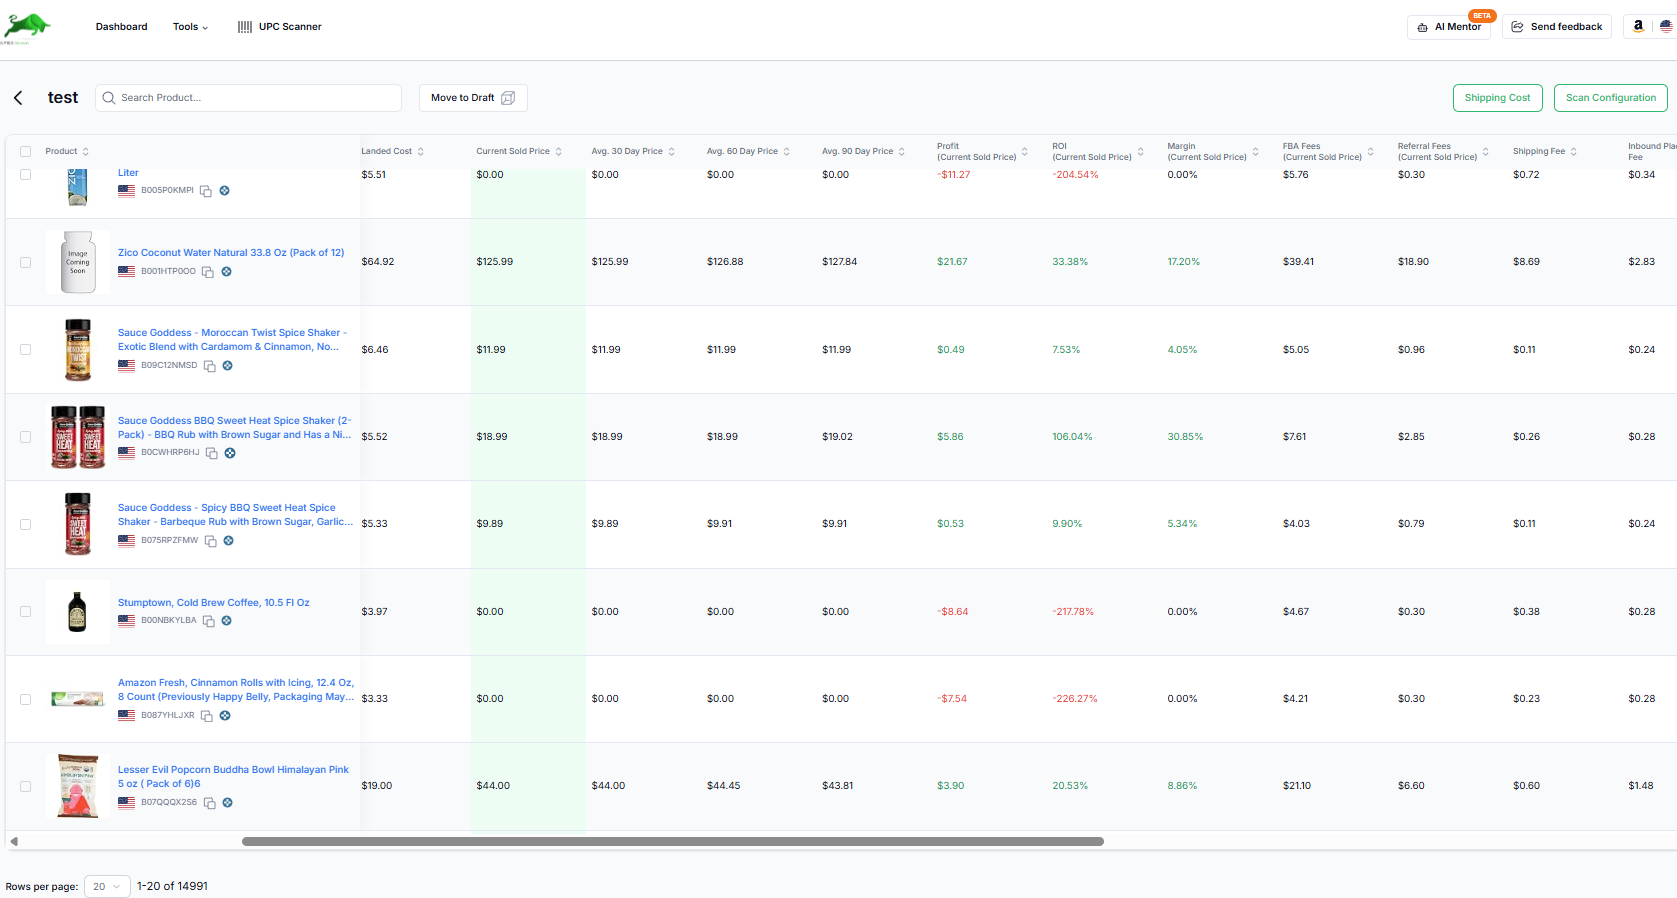
A price list scanner does the number work behind the first checks on the whole file at once: it matches every barcode to Amazon, works out fees and profit, and lets you filter the results. Judging the price history, the season and the competition is still up to you.
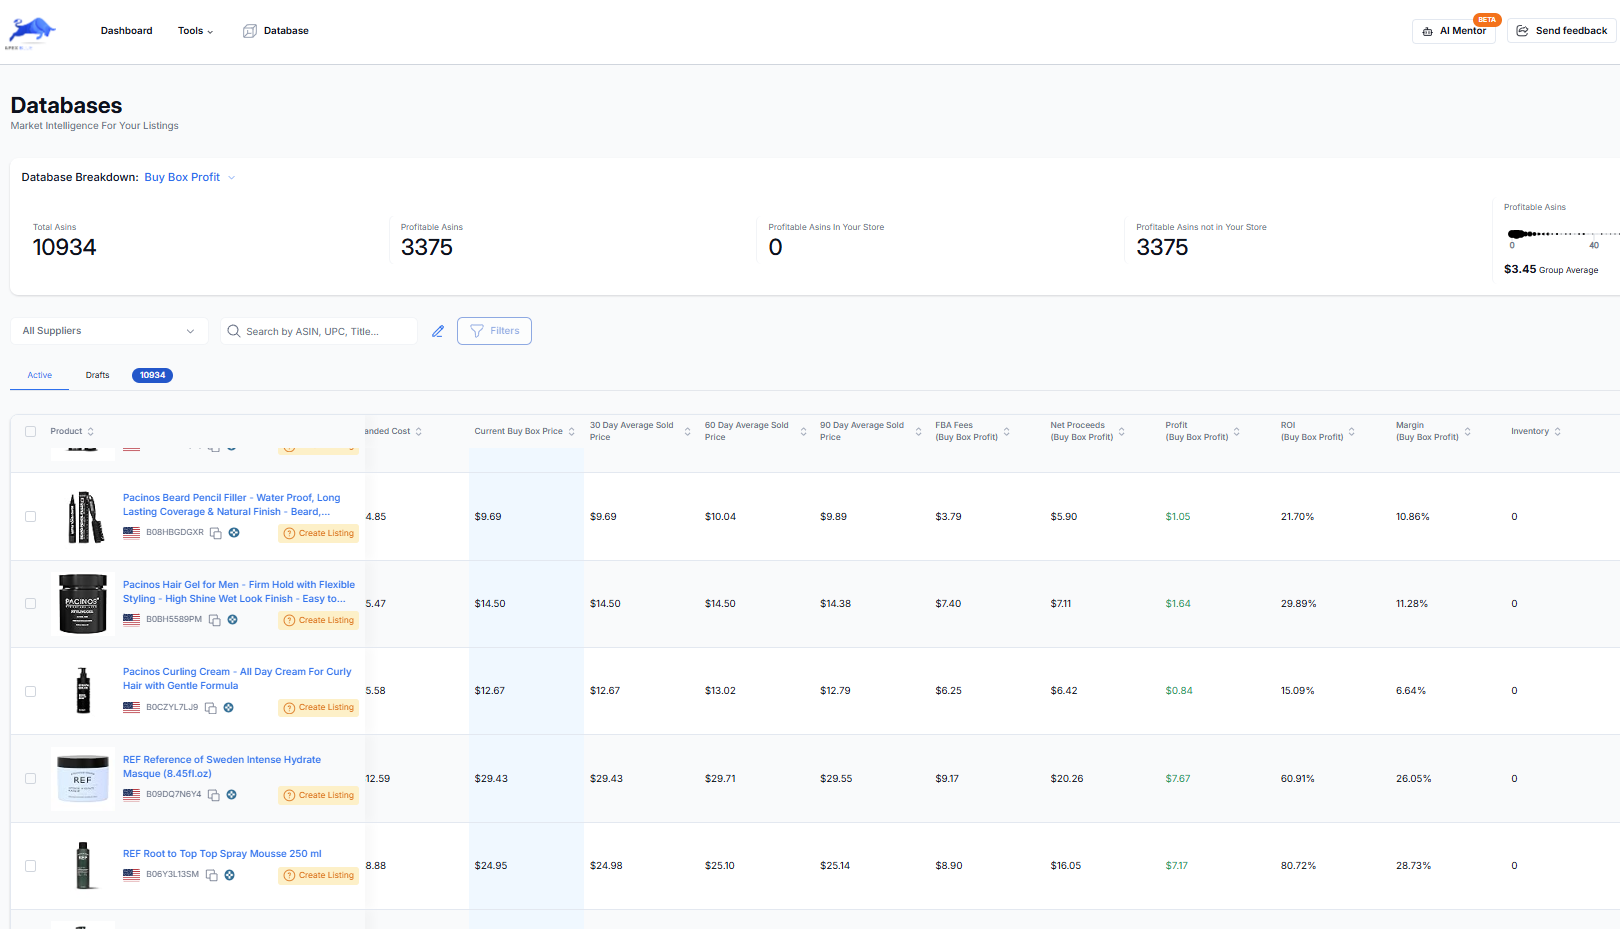
Apex Green is Apex's scanner. It matches your list against 122M+ products on Amazon, using 98M+ UPC and EAN codes. For each match it shows the landed cost, Amazon price, Amazon's fees, profit at the Buy Box, ROI and margin, sales rank and seller count. It flags three things from the checks above: hazmat, meltables, and whether Amazon is on the listing. You can filter by profit, ROI, sales rank, seller count and whether Amazon sells the product, and hide products you already carry.
What it doesn't do matters just as much:
- Approval. It doesn't tell you whether your account can sell a product. Check that in Seller Central (check 8).
- Brand complaint risk. No flag for it. That check stays with you (check 9).
- Expiry dates. It can't know how fresh the supplier's stock is. Ask the rep (check 10).
- Freshness. Prices, ranks and offers refresh for the products sellers track, so a product nobody tracks yet can show older figures until it's refreshed. Profit uses the cost in your file plus the shipping you set, so check bundles and case packs before you order.
Stef's advice is to filter broadly at first and narrow later:
"This is where you wanna go very broad."
From Stef's lesson, the walkthrough at 8:01
His reason, a few seconds later, is that Amazon is a marketplace and prices and ranks are always changing. A line that just misses today can pass next month, so keep the near misses in your database and you'll see them when the numbers move, without scanning the list again.
Here's what each plan includes for scanning:
| Beginner | Starter | Pro | |
|---|---|---|---|
| Price | $49.99 a month | $149 a month | $299 a month |
| Price lists scanned a month | 2 | 5 | Unlimited |
| Lines scanned a month | 20,000 | 60,000 | Unlimited |
| Products in your database | 500 | 2,000 | 50,000 |
| 30, 60 and 90 day average prices | No | No | Yes |
On a plan without the average price columns, do check 5 in Keepa or on the listing's price history before you buy. Every plan starts with a 7-day trial.
Two real catalogs, and what they came down to
It helps to see what an ordinary list actually yields. Both examples below come from Stef's lessons, filmed on an older version of the software. They're one list each, not an average, and yours will be different. The point is the shape: a big file narrows to a short list fast.
The first list is one distributor's catalog, scanned in a demo account in the walkthrough lesson.
- The scan matched 4,398 ASINs to the supplier's barcodes (7:49).
- A broad first filter, at least $1 profit and a sales rank between 1 and 150,000, left 187 (8:52).
- He then looked at every supplier in that account together and narrowed to rank 1 to 90,000, at least $2 profit and 20% ROI, which left 177 across all of them (12:39). From there he went line by line, checking each price against its averages.
The second list is a beauty and personal care supplier with a $5,000 minimum order, in the Purchasing lesson.
- 699 of the supplier's products were in the analysis, and 130 showed any profit at the current Buy Box price (2:58).
- His filter, at least $1.50 profit, 20% ROI and rank 1 to 90,000, left 19 (6:35).
- One of those was hazmat, so he deleted it and was down to 18 (7:24).
- Then he checked each price against its 30, 60 and 90 day averages and dropped the ones whose profit depended on a spike, before setting quantities for the order.
| First list | Second list | |
|---|---|---|
| Starting point | 4,398 matched ASINs | 699 products in the analysis |
| Any profit at today's Buy Box | not shown | 130 |
| After the first filter | 187 | 19 |
| After hazmat | not shown | 18 |
| After price history | picked line by line | picked line by line |
In the second list, 19 of 699 products passed the first filter, fewer than 3 in 100, and that's before the approval, brand and expiry checks. Most price lists produce far fewer buys than lines. A list where a handful of products pass is a working list.
Products to walk away from
Some lines fail the checks so clearly that you can drop them on sight:
- the barcode matches nothing, or only a pack size you can't rebuild from the supplier's units,
- it only makes money at today's price, and the 90-day price says otherwise,
- the price is falling while new sellers keep arriving,
- Amazon holds most of the Buy Box,
- it's hazmat and you're not set up for it, or a meltable outside the window you'd ship in,
- the supplier's stock is short-dated,
- the brand restricts Amazon sellers, or uses Transparency and your supplier can't provide coded units,
- the supplier can't tell you whether they're authorized for the brand,
- you can't get approved for it, and there's no realistic way to.
Walking away from a line isn't a loss. The products you skip are what keep your cash free for the ones that work.
From shortlist to first order
By now you have a short list, each line with a realistic price, a profit, an ROI and the most you can pay. A few steps turn it into an order:
- Confirm the prices. Send the rep your short list and ask for current prices and stock. Lists go stale.
- Ask for a better price on the best lines. Your maximum supplier cost from check 5 tells you where you stand. Our guide to negotiating with distributors covers how.
- Start small across several products. Amazon's own advice on new suppliers points the same way (below).
- Size each line and build the order. How many units to buy, how to round to case packs and how to split your budget across products is the next guide: your first wholesale order. Our purchase order workflow covers tracking it through to delivery.
- Keep the invoice. It proves where your stock came from, and it may be the document you use to get approved in a gated category.
Then scan or check the list again in a few weeks. Prices move, and a line you dropped today can pass next month.
Questions about analyzing price lists
How long does it take to analyze a wholesale price list?
By hand, plan on a few minutes a line, so a list with a few thousand lines is days of work. With a scanner, the matching runs in the background and the slow part is reviewing the short list: price history, competition, approval, brand and expiry for the lines that pass your filters.
What should a supplier price list include?
At least the item title with its size, the supplier's item number, the unit UPC or EAN, the cost of one single unit and the case pack. If the Amazon listing is a multipack, add how many units make one listing. If a supplier only quotes case prices, divide by the case pack before you check anything.
Why does nothing on my supplier's price list look profitable?
First rule out mistakes: costs entered per case instead of per unit, barcodes that lost their leading zeros, or matches to the wrong pack size. If the numbers are right and nothing passes, the supplier's prices may sit too close to what the products sell for on Amazon. Ask for better pricing on your best lines, check another distributor for the same brands, or move on to a different list.
Should I check every line, or only brands I already know?
Check every line. Familiar brands are often the most crowded listings, and the products that pass are often ones you'd never have picked by eye. Skipping lines is how sellers end up buying the same obvious products as everyone else.
Every guide in this part
- Amazon FBA Purchase Orders: The Complete Workflow GuideA repeatable purchase order workflow for Amazon wholesale sellers, from deciding order quantity to reconciling what landed against what you paid for.Read
- Apex for Amazon Sellers: a Chrome extension for profit, fees and sales estimatesA Chrome extension for Amazon sellers. Install it, finish Apex University, and see profit, fees and sales estimates on Amazon listings and supplier sites.Read
- Reading Keepa Charts for Wholesale: A Practical FrameworkHow to read a Keepa chart in under a minute and decide if a product is worth a wholesale purchase order, plus what experienced sourcers check first.Read
- Your first Amazon wholesale order: how much to buy and how to split itHow to test small across several products, size each line from sales and case packs, plan the cash beyond the order, and build your first purchase order.Read
New sellers under $5,000 a month in Amazon sales. 2 supplier price lists a month, up to 20,000 lines, 500 products, purchase orders and profit and loss.
Beginner, $49.99 a monthUp to $5K/mo in revenue
Start my 7-day trial on Beginner7 days free, then $49.99 a month, plus tax where applicable. Card required, nothing charged until day 8. Cancel any time before then.
Apex for Amazon Sellers is free to install, and its numbers open when you finish Apex University. Create a free account, work through the lessons, then install it from the Chrome Web Store.
Sources
- Selling plans and pricing, Amazon
- How to find wholesalers, Amazon
- Expiration-dated products, Amazon Seller Central
- How to use the FBA Revenue Calculator, Amazon
- What Amazon FBA sellers should know about dangerous goods, Amazon
- Dangerous goods (hazmat) identification guide, Amazon Seller Central
- Meltable FBA inventory, Amazon Seller Central
- Supply chain by Amazon (FBA storage rates by season), Amazon
- Transparency, Amazon
Some of Amazon's pages need a Seller Central sign-in to read, and we have not yet checked their current wording for this version of the page. If Amazon's page and this guide disagree, Amazon's page is the one that counts.
How to test small across several products, size each line from sales and case packs, plan the cash beyond the order, and build your first purchase order.